Creating Your First VPC: A Step-by-Step Guide
One of the most useful (and in my opinion, coolest!) features of the AWS cloud is the ability to create your own Virtual Private Cloud (VPC).
What is a VPC? It’s a private virtual network that allows you to design and launch scalable, secure networks in a matter of minutes. VPCs are logically isolated from other network in the AWS cloud, meaning by default, traffic cannot flow in or out of them.
In this tutorial we will walk through how to launch a VPC and organize your resources into public and private subnets. Both subnets will have the ability to initiate outbound requests to the public Internet, but only the public subnet will be able to receive and respond to inbound traffic from the Internet.
At the end, we’ll have built a network that looks like this:
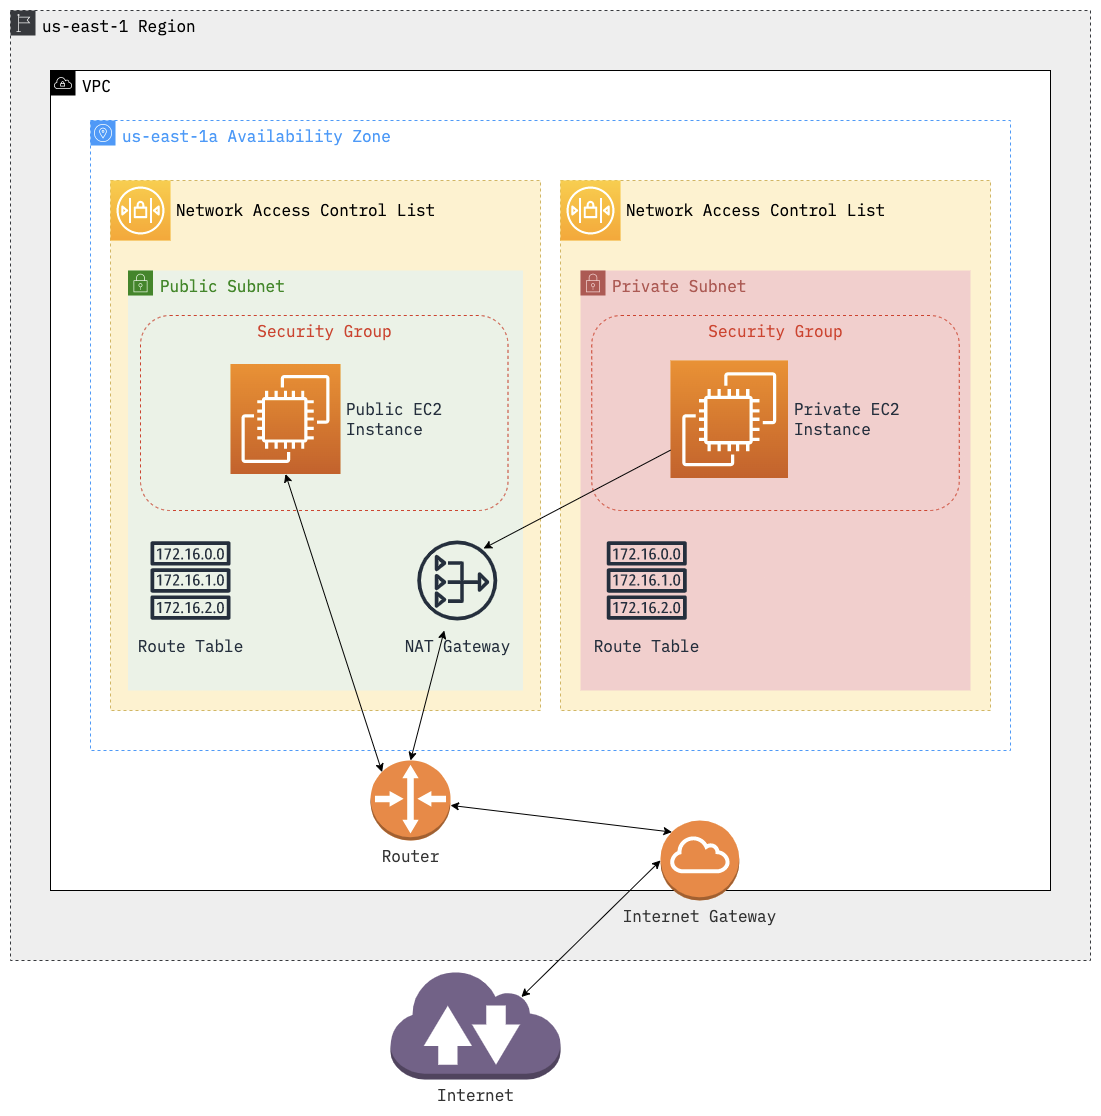
Let’s get started!
Default VPC⌗
When you open the VPC dashboard in the AWS console for the first time, you’ll notice there is already a VPC running. This is the default VPC that Amazon creates for you.
Each account has 1 default VPC in each region. Unlike any newly created VPCs, the default VPC is already configured to be publicly accessible for your convenience. This is what allows one to launch an EC2 instance with a public IP and DNS name without needing to go through the extra steps we’re about to perform manually.
We are free to edit the default VPC as desired, but for this demo we will create a new VPC from scratch.
Step 1: Create a VPC⌗
Alright, from the VPC dashboard page we can click the “Create VPC” button to get started.
⚠️ VPCs are launched in a single region and cannot be moved after they are created, so make sure to choose the region that makes sense for you if you are following along. I will be using the
us-east-1region.
In the “VPC Settings” section we will choose the “VPC only” option since we are going to be creating each of the components of our network manually. “VPC and more” is a wizard that allows you to launch pre-configured subnets, route tables, and Internet connectivity.
Next, we need to assign an IPv4 CIDR block. You are able to choose your own IP range so long as the size is between a /28 and /16, and it is recommended you use a range within one of the IP spaces designated for private use in RFC 1918.
For this demo we will go with 10.0.0.0/16. You can add up to 4 secondary CIDR blocks if needed, but the primary block cannot be changed once the VPC is created.
For “Tenancy” we will stick with default, as running on dedicated hardware would be quite expensive.
And with that, we can click the create button to launch our VPC. You should see a green bar at the top of the page with a success message assuming there were no issues.
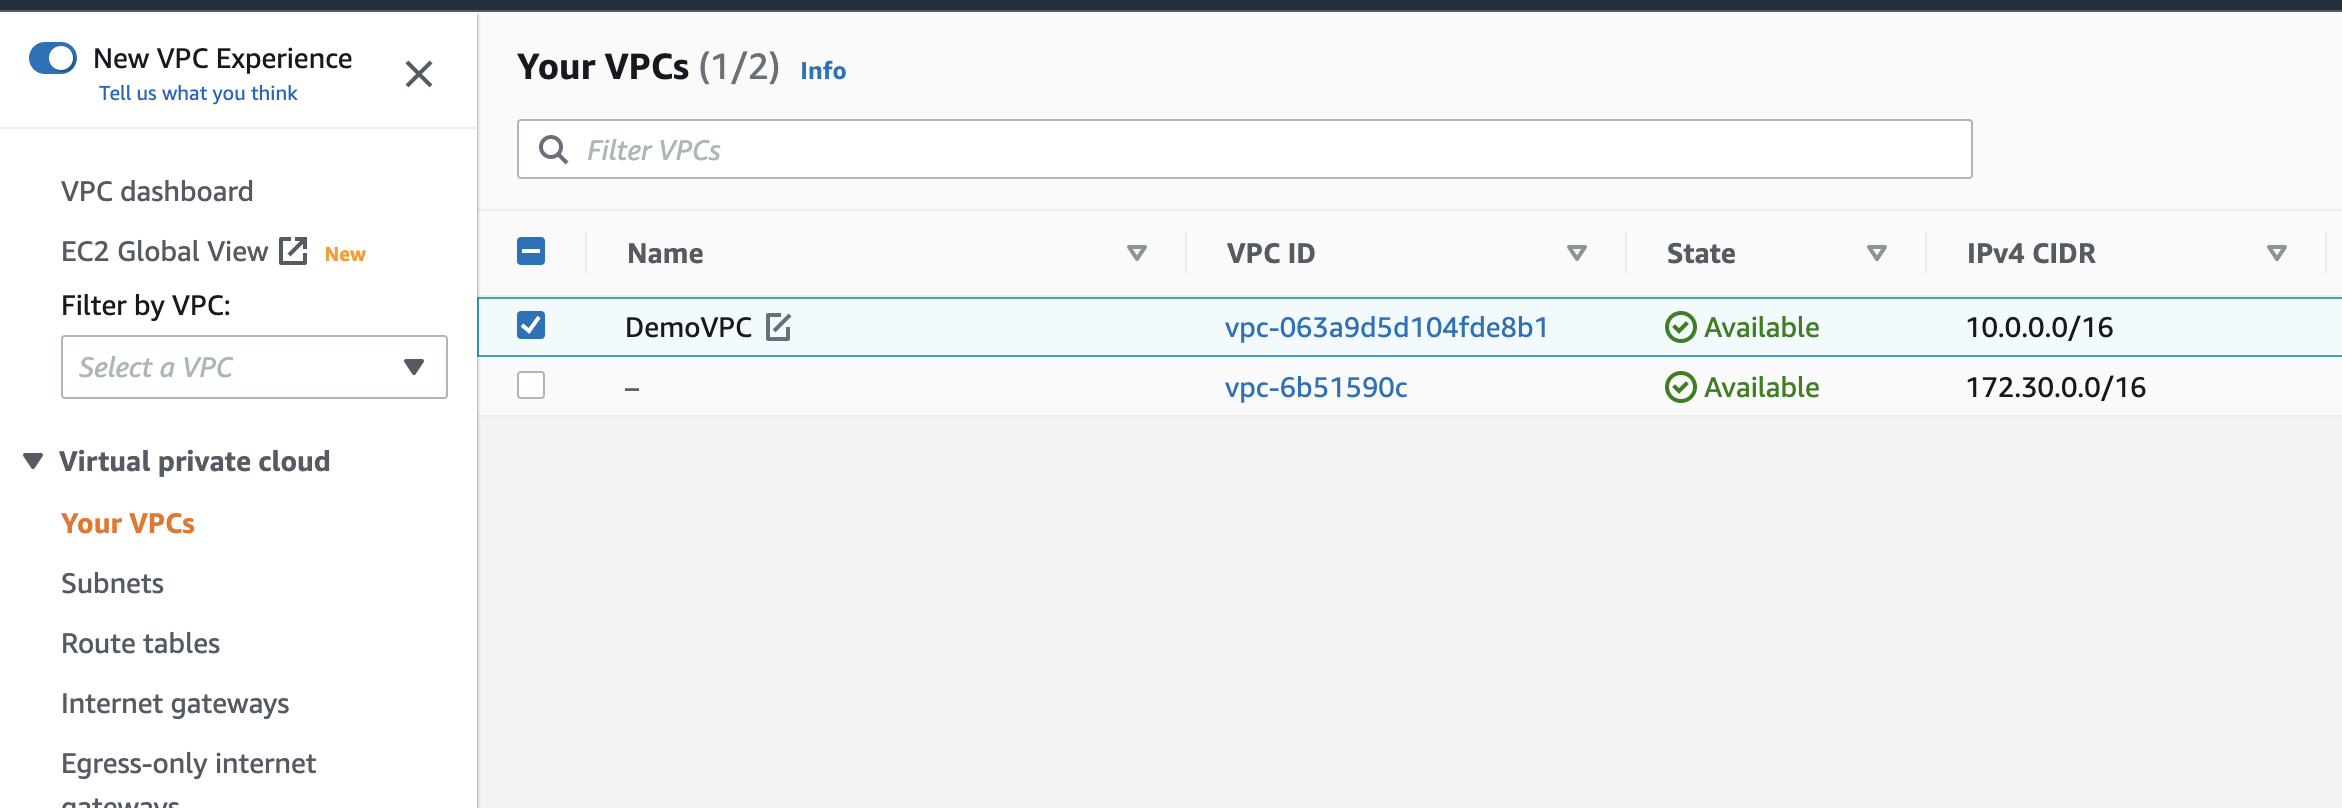
Now, from the left side menu we can navigate to “Your VPCs” and see 2 VPCs running: the default VPC created by Amazon and the new one we just created.
Let’s click the edit icon in the name field of our new VPC to give it a name so it is easily identifiable. You can tell the difference between them by looking at the IPv4 CIDR column.
👍 Pro Tip: If you select your new VPC from the “Filter by VPC” field in the left menu, it will automatically filter out all other resources in the current view that are not associated with the selected VPC.
Step 2: Add Subnets⌗
Within our VPC we are able to create subnets, which are really just logical groupings of resources.
For example, it is common to have a public subnet that is exposed to the Internet and contains EC2 instances serving a webapp. Separately you can have a private subnet to launch RDS instances or other databases in. And you may have a 3rd subnet running a cluster of containers that are handling some BI/analytics workloads.
It’s also very common to replicate resources across multiple subnets in different availability zones in order to ensure the apps/services running within them are resilient and tolerant to faults in a single AZ.
As VPC’s are not a managed service, it is up to you to design, configure, and secure your subnets and resources within them.
In this demo we are going to keep it fairly simple and launch 2 subnets (1 public, 1 private), each with a single EC2 instance.
From the VPC menu on the left, we can navigate to “Subnets” view and then click the “Create Subnet” button.
In the “VPC” box we’ll select our newly created VPC to launch the subnets into.
Next, in the “Subnet settings” box, we have a few fields to set:
- Subnet name — our first subnet will be our public one so let’s name it
PublicSubnet. - Availability Zone — each subnet is launched in an AZ, and this cannot be changed later. It doesn’t matter what you choose here, but for the purposes of this demo we’ll create both subnets in the same AZ, and I am going to use
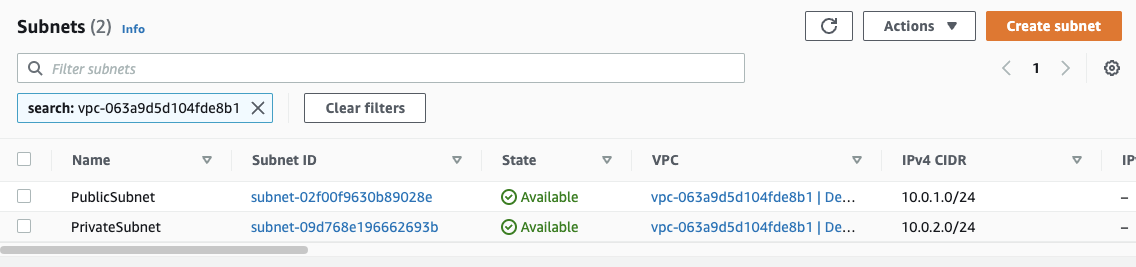
us-east-1a. - IPv4 CIDR block — each subnet is assigned its own CIDR block which should be a subset of the VPC’s CIDR block. We’ll use
10.0.1.0/24for our public subnet. This gives us 256 total IPs, although only 251 of those are usable since AWS reserves the first 4 and last 1 IP in each subnet.
We can click the “Add new subnet” button to go ahead and create our private subnet at the same time. For that, we’ll use the following settings:
- Subnet name —
PrivateSubnet - Availability Zone — use the same as the public subnet.
- IPv4 CIDR block —
10.0.2.0/24
Finally, click “Create subnet” to finish.
Step 3: Configure Network Access Control⌗
VPC’s use Network Access Control Lists (NACLs) as a stateless firewall to control which traffic is allowed in and out of our subnets.
AWS creates a default NACL for each VPC that allows all inbound and outbound traffic. The default NACL is automatically associated with each subnet in the VPC until you explicitly associate a subnet with a different NACL.
That means currently our “private” subnet isn’t really private after all. We need to create a new NACL to lock it down.
- From the left side menu, choose “Network ACLs” and then click the “Create network ACL” button.
- Name it
PrivateNACLand choose ourDemoVPCto launch it in. - Click “Create network ACL”
- From the “Actions” menu, choose “Edit subnet associations”
- Choose the
PrivateSubnetand click “Save changes”
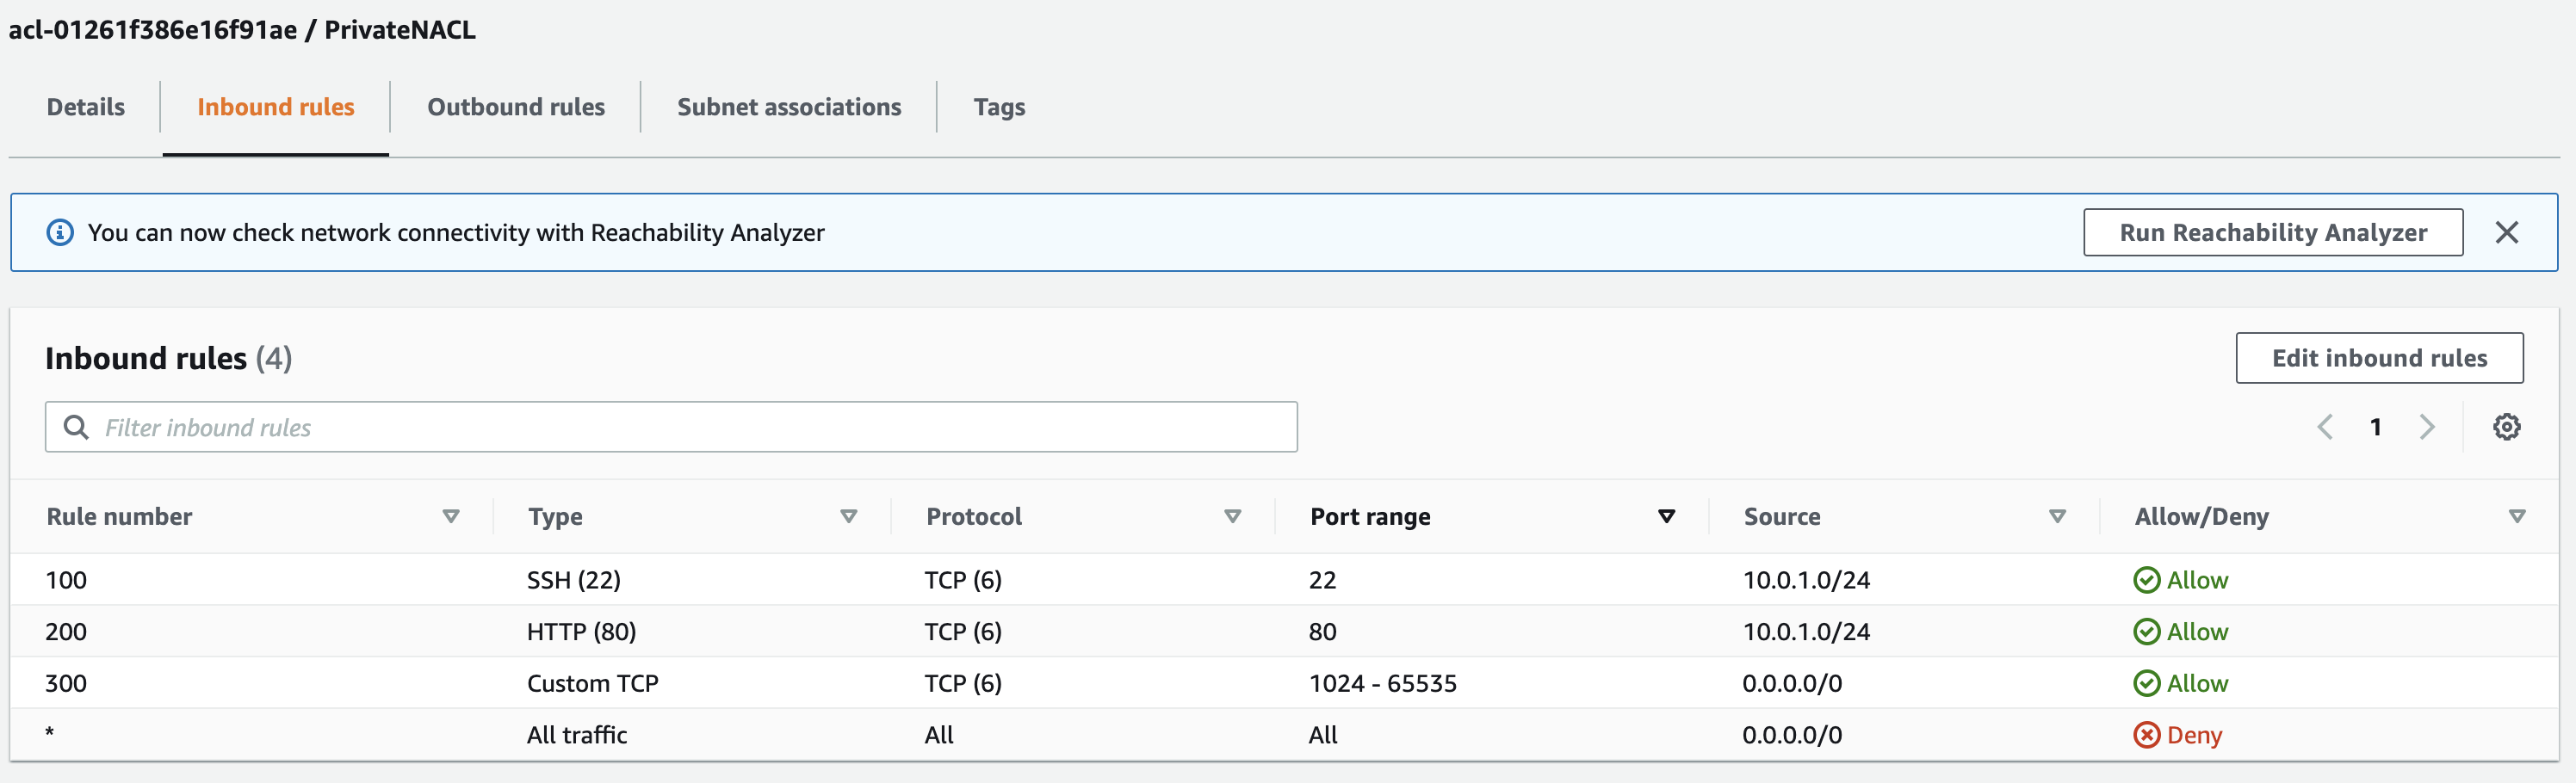
Newly created NACLs are the opposite of the default NACL — all traffic is denied by default. So next, we need to add a few rules to allow traffic from our public subnet, and to allow all outbound traffic.
- Select the
PrivateNACLand then choose “Edit inbound rules” in the “Actions” menu. - Click “Add new rule”
- Amazon recommends adding rule numbers in increments of 100, so for our first rule we’ll use
100as the rule number. The Type will beSSH (22), and Source will be the CIDR block associated with our public subnet:10.0.1.0/24. This rule is allowing traffic with a source IP anywhere in the range of our public subnet to port 22 of any resource in our private subnet to pass. - Add another rule for
HTTP (80). The rule number can be200, and use the same IP range for the Source. - There is one more rule to add: a
Custom TCPrule number300for ports1024-65535from Source0.0.0.0/0- 🤔 Huh? Ports above 1024 are called “ephemeral ports”. Random ephemeral ports are where our private instance will receive responses back from its outbound traffic, so we need to open these ports in order to be able to receive traffic coming back from the Internet through our NAT gateway. Later when we launch our instances we’ll see how the private instance’s security group will still prevent it from receiving connections that don’t originate from our public subnet.
- Save changes
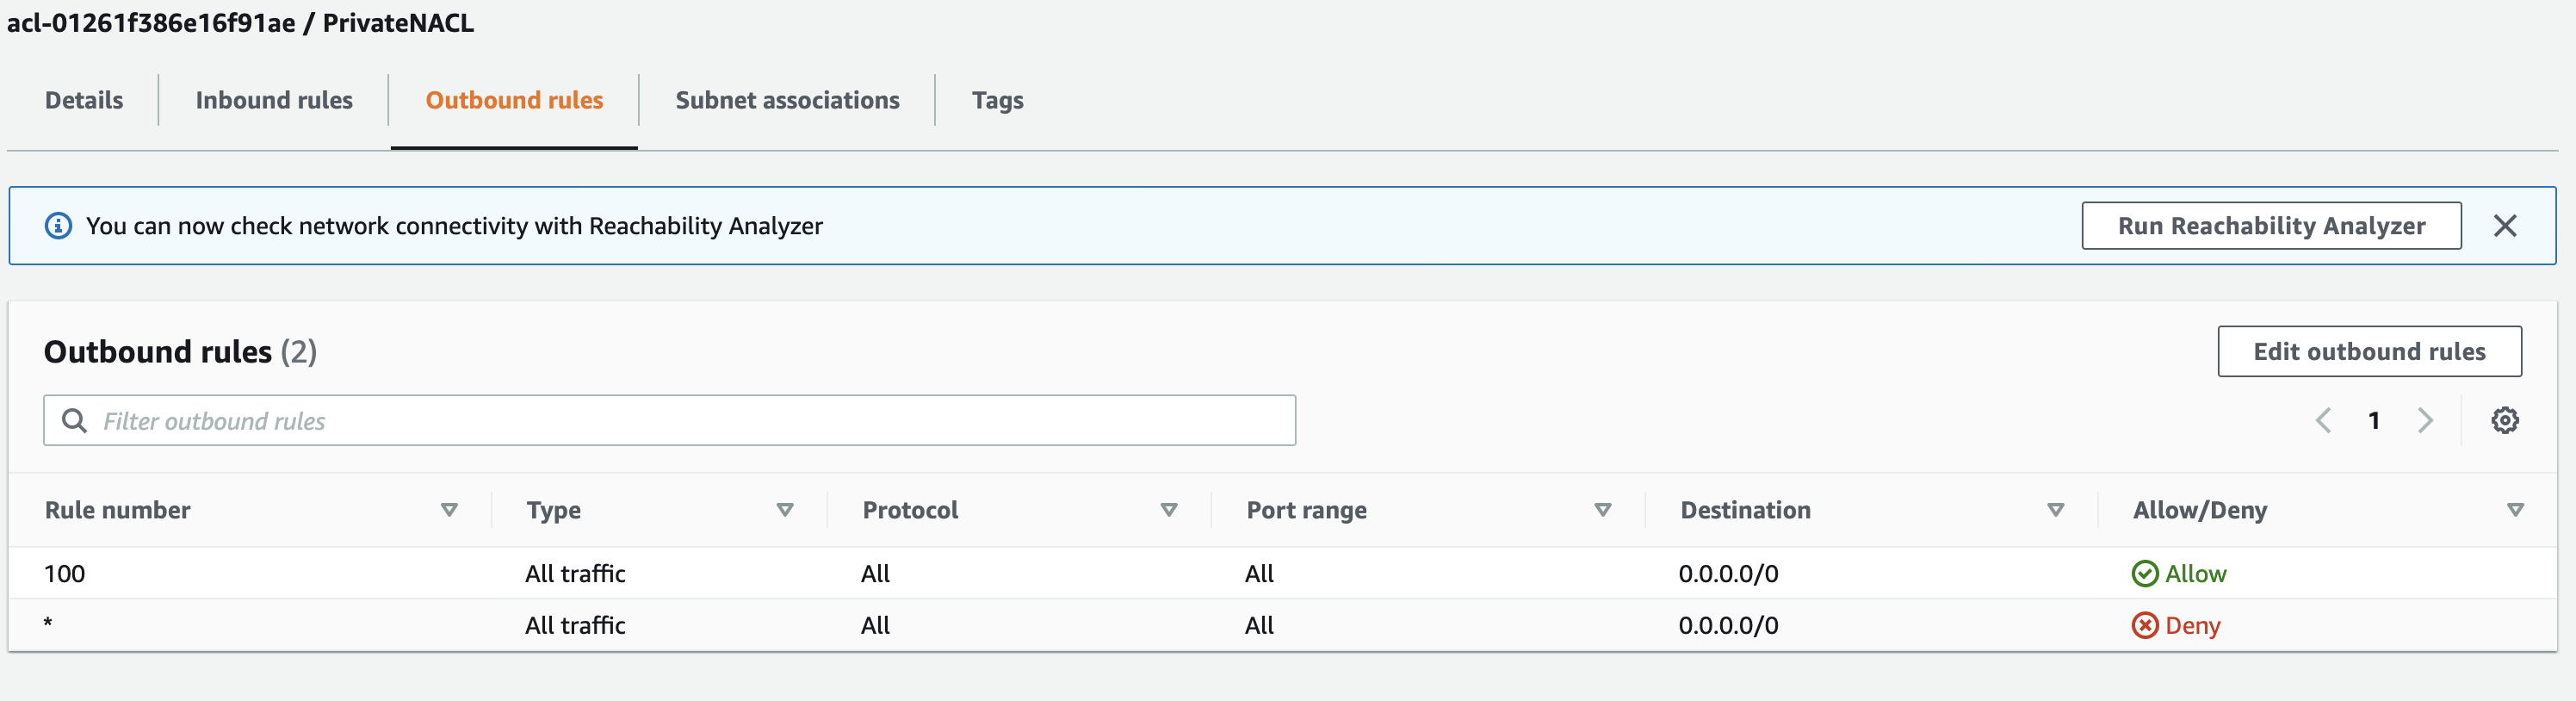
Since NACLs are stateless, we must define inbound and outbound rules. If we stopped here, our instances would receive traffic from the public subnet but responses would not be able to get back out.
- Select the
PrivateNACLagain and this time choose “Edit outbound rules” in the “Actions” menu. - Add a new rule number
100, Type =All traffic, Destination =0.0.0.0/0. (To keep it simple we’ll allow traffic out on all ports to all destinations, but in a real environment we’d likely want to be more targeted.)
Now our private subnet is a private as we can make it without also disabling outbound Internet access. And again, in a real environment, it would also be good idea to create a new NACL for our public subnet and configure it to only allow the traffic in that is needed. Even though it is meant to be publicly accessible, in this case we still only want to allow traffic in on ports 80 and 22. But for the purposes of our demo, we can keep using the default NACL for that subnet.
For a more detailed explanation of how NACL rules work, see the documentation.
Step 4: Add Internet Connectivity⌗
Before we launch our instances we’ll want to add Internet connectivity to our VPC. Without it, our instances won’t be able to download software updates, and we won’t be able to connect to even the instance in the public subnet.
First we need to add an Internet gateway (IGW) to our VPC. You can think of an IGW as similar to a cable modem you may have at home to connect to your ISP.
- Switch back to the VPC view in the AWS console and then navigate to “Internet gateways” from the left side menu.
- Click the “Create internet gateway” button
- Give it a name — I’ll use
demo-igw - Click the “Create internet gateway” button
- Once it is created, it will be in a “detached” state by default. From the “Actions” menu choose “Attach to VPC” and attach it to the
DemoVPC.
Once attached, we have one last step to enable Internet connectivity. By attaching the IGW we’ve created the option to route traffic to the Internet, but next we need to create a route table for our public subnet where we can define the route for traffic to take from our subnet to our IGW.
From the left side menu we can navigate to the “Route tables” view, and you’ll notice there already exists a route table for our VPC. This is the default route table that is created automatically, and unless we explicitly assign it or another route table to our subnets, they will implicitly use this default table.
Let’s click “Create route table”, create a new one named PublicRouteTable, and attach it to our DemoVPC.
After is it successfully created, we can select “Edit subnet associations” from the “Actions” menu, and associate our PublicSubnet with it.
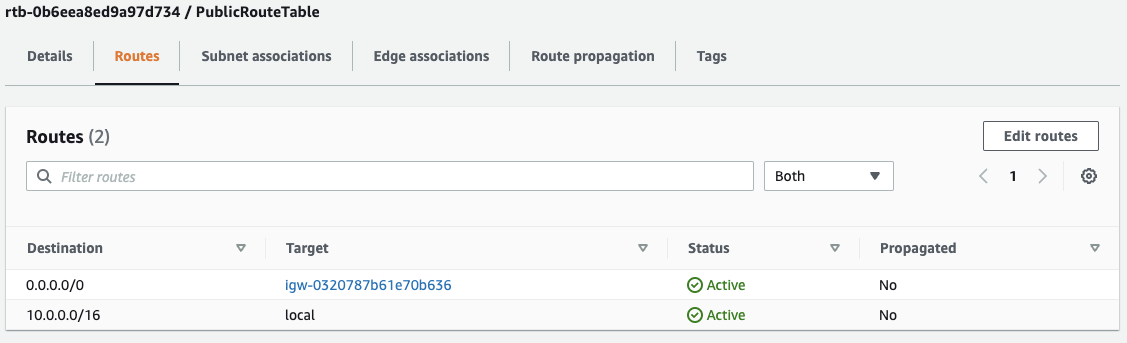
Next, select “Edit routes” from the “Actions” menu.
There is already one route for IPs within 10.0.0.0/16 — this is our local route, and it is what allows instances in this subnet send traffic to other subnets in our VPC.
Let’s add a new route to destination 0.0.0.0/0 and set our IGW as the target. This may seem a little confusing at first because technically any 10.0.0.0/16 address also falls within this block as well, but route tables look for the most specific match when making routing decisions. In other words, our router is smart enough to route internal traffic to its intended destination within our VPC, and will send everything else out to the Internet.
Now we should be able to communicate with the Internet to and from our public subnet, but how does the private subnet get Internet access?
For that, we’ve got a little more work to do. We only want to allow outbound requests from our private subnet, and to deny inbound requests from the Internet. Also, instances in our private subnet will not have public IP addresses, so we’ll need to set up a NAT Gateway (NATGW) to help with address translation.
From the left side menu, navigate to “NAT gateways” and then click the “Create NAT gateway” button.
⚠️ NAT gateways are pay by the hour and bandwidth usage, and get pricey quickly.
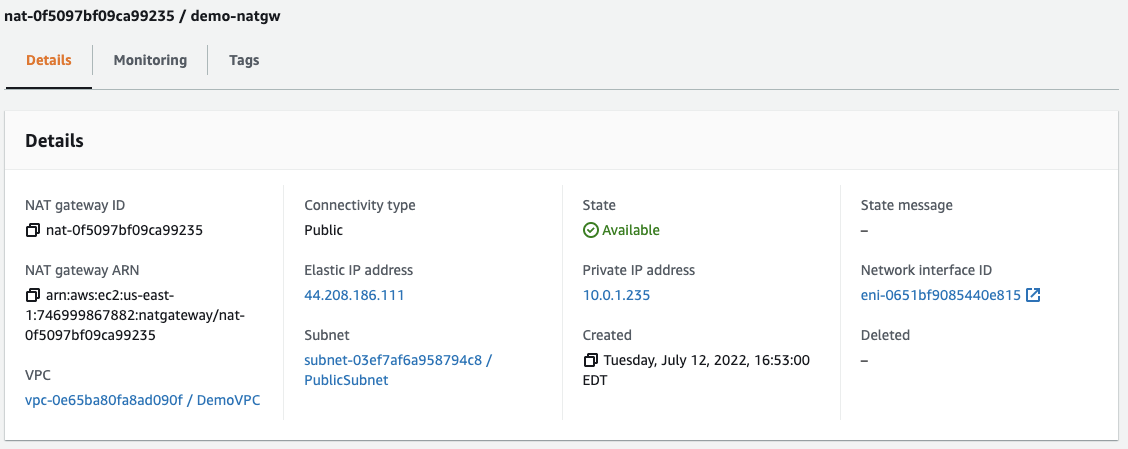
- Name —
demo-natgw - Subnet — we’ll place the NATGW in our
PublicSubnetsince that is where our route out to the Internet is, and NAT gateways cannot be placed within the same subnet with the instances that will use them. - Elastic IP allocation ID — click the “Allocate Elastic IP” button to provision an Elastic IP and associate it with this NATGW. This will be the public IP address of our NATGW.
This will be created quickly but takes a few minutes before the state changes to Available, meaning it’s ready to be used.
While it initializes we can go ahead and create a route table for our private subnet named PrivateRouteTable.
- After it’s created, go to “Edit subnet associations” from the “Actions” menu and attach it to the private subnet.
- Go to “Edit routes” from the “Actions” menu and a new route for destination
0.0.0.0/0with our NATGW as the target.
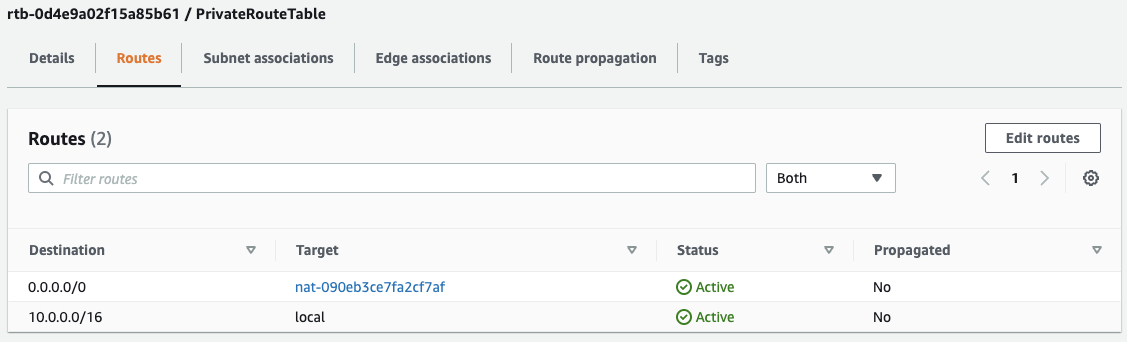
By adding this route, we’re telling our router that any traffic with a destination outside our VPC should route through our NAT gateway, which will replace the private source IP on the network packets with its public IP. From there, the NAT gateway will forward the traffic out through our Internet gateway.
Step 5: Add Our Instances⌗
Now that we have our subnets and routing in place we can go ahead and add an EC2 instance to each.
Public Instance
We’ll create our public instance first. This will be used to serve a very basic hello world web page. It will also serve as our bastion host, which is just a funny name for a jump box. Since our private instance will be, well, private, we won’t be able to connect to it directly. Instead, to get to our private instance we’ll first connect to the public instance and then “jump” to it from there.
So in the AWS console let’s navigate to the EC2 dashboard and click “Launch instance” to set this up.
We can simply name this box our PublicInstance, and use the default selection of Amazon Linux for our AMI. For the instance type we can also stick with the default of t2.micro.
We’ll need to either create a new key pair or select an existing one in order to be able to SSH to our instance once it’s up.
In the “Network settings” box click the “Edit” button and let’s walk through each of these:
- VPC — make sure this is set to our
DemoVPC. - Subnet — we want to launch this instance in the
PublicSubnet. - Auto-assign public IP — change this to “enable” so our instance will be assigned a public IP address when it is launched. (This setting can be enabled by default by editing the subnet’s settings.)
- Firewall (security groups) — we will create a new security group here. We can name it
public-sgand under the “Inbound security group rules” we want to open up SSH (port22) and HTTP (port80), both with “Source type” set toAnywhere. Normally we’d want to restrict SSH access just to the IPs we need to be able to connect from, but since will just be a short-lived demo we can keep it open wide.
NOTE: Security groups are another firewall layer, but they protect one or more EC2 instances rather than the whole subnet, which is the responsibility of NACLs. Also unlike NACLs, security groups are stateful. That means traffic that is allowed in one direction is automatically allowed back in the other direction.
Click the arrow to expand the “Advanced details” box and scroll all the way down to “User data” at the bottom. Here we’ll paste in a simple bootstrap script that will install an HTTP server and create a simple web page.
#!/bin/bash
yum update -y
yum install -y httpd
systemctl start httpd
systemctl enable httpd
echo "<h1>Hello World from $(hostname -f)</h1>" > /var/www/html/index.html
Go ahead and click “Launch instance”, and while that is initializing we can go ahead and launch our private instance as well.
Private Instance
To keep things simple we will use almost the exact same settings here with a few exceptions. For starters, it’ll be named PrivateInstance.
Under “Network settings” we’ll have a few different settings:
- Subnet — choose our
PrivateSubnetthis time. - Auto-assign public IP — keep this disabled, as this instance will not be publicly exposed.
- Firewall (security groups) — we will create another new security group, this time named
private-sg. We will add rules for SSH and HTTP again, except this time the “Source type” will be Custom, and from the “Source” field we can select ourpublic-sg. This will allow only of our public instances, so long as they use this security group, to reach our private instances.
If this were a real application we might have a private API running on this private instance that we only want our public app to be able to access, but for the purpose of this demo we can reuse the same user data script to set up a hello world page.
Now we just need to wait 2-3 minutes after the instances are created to allow the bootstrap script to complete before testing that everything worked. You’ll know it’s ready when the “Status check” column in the Instances view is green.
Step 6: Test It Out!⌗
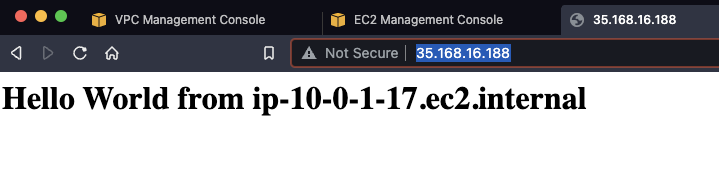
Once it’s ready, grab the public IPv4 address on the public instance and throw it in web browser. (Make sure you’re connecting over http as we have not set up support for https)
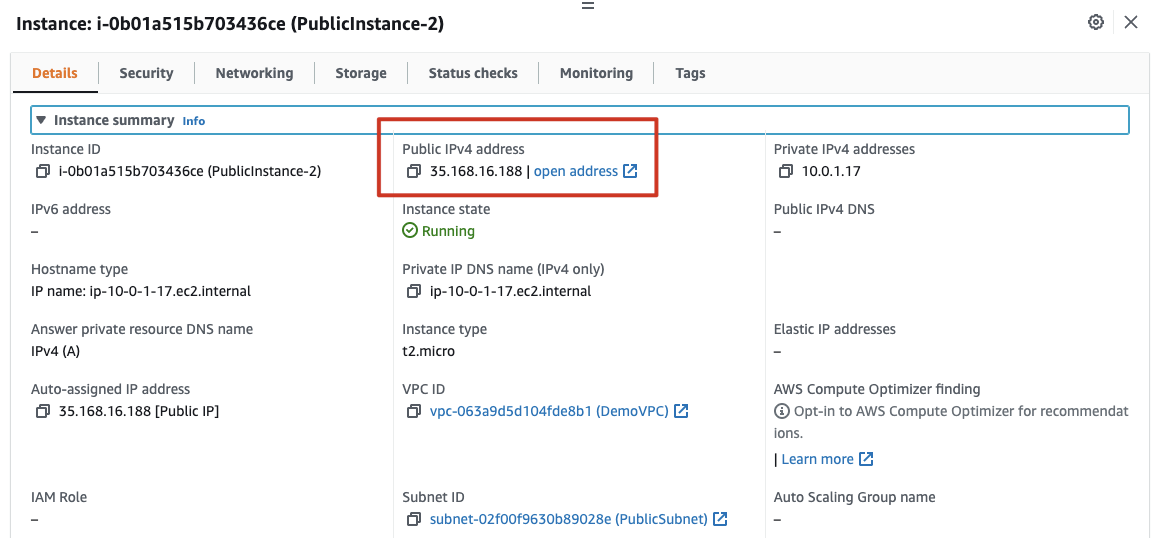
You should see something like this (although probably with a different internal IP):
Now, to test the private instance we first need to SSH to the public instance. Then we can make a curl request to the private IP of PrivateInstance to verify we have connectivity.
bash-3.2$ ssh -i vpc-demo.cer ec2-user@35.168.16.188
The authenticity of host '35.168.16.188 (35.168.16.188)' can't be established.
ECDSA key fingerprint is SHA256:yK0OUdUAUFUJS0kx0HarYJuFuc+WcQJVhUa4GUVWnLg.
Are you sure you want to continue connecting (yes/no/[fingerprint])? yes
Warning: Permanently added '35.168.16.188' (ECDSA) to the list of known hosts.

       __|  __|_  )
       _|  (     /   Amazon Linux 2 AMI
      ___|\___|___|

https://aws.amazon.com/amazon-linux-2/
[ec2-user@ip-10-0-1-17 ~]$ curl http://10.0.2.81
<h1>Hello World from ip-10-0-2-81.ec2.internal</h1>
You can also copy your keypair to the public instance if you want to SSH into the private instance.
If you’ve made it this far, congrats! It is a lot of work to stand a tiered VPC up, but I hope this demo shows you just how powerful VPCs can be and why you might want to use them.